Outdoor Landscaping and Grading on a Budget: Pro Results for Less
Outdoor Landscaping and Grading on a Budget: Pro Results for Less
Key Takeaways
- Cost Efficiency: Landscaping your garden doesn't require a £500+ rotary laser. Modern, high-precision green line lasers offer a heavy-duty, budget-friendly alternative.
- Drainage is Vital: UK Building Regulations dictate specific "falls" for drainage (often 1:60 or 1:80 for patios) to cope with heavy British rainfall. Precision grading is non-negotiable.
- Visibility Matters: Spotting laser lines up to 60m outdoors in bright daylight requires a receiver and a laser equipped with pulse mode.
- Smart Investment: Purchasing an affordable site levelling tool often costs less than hiring professional equipment for a weekend, and you keep the tool for future projects.
According to recent data from Checkatrade, the average cost of a complete garden redesign in the UK sits at around £10,000, with extensive groundworks and grading accounting for a massive portion of that bill. For the ambitious DIYer, tradesperson, or small landscaping firm, mastering outdoor landscaping and grading on a budget is the ultimate way to drastically reduce costs without compromising on the final finish.
Whether you are laying a sweeping Indian sandstone patio, installing raised sleeper beds, or preparing ground for fresh turf, getting your levels right is the foundation of the entire project. But how do you achieve millimetre-perfect results without dropping a small fortune on proprietary rotary systems? The secret lies in choosing the right laser level for landscaping UK projects, understanding the basics of site grading, and working smarter, not harder.
Landscaping Challenges: Why Manual Levels Fail in Large Gardens
Historically, budget-conscious builders and DIYers have relied on string lines, wooden pegs, and long spirit levels to grade outdoor spaces. While these traditional methods work for a small 2m² shed base, they rapidly fail when scaled up to a typical British garden.
String lines sag over distances, especially when wet, and wind interference can cause massive discrepancies. Using a 2-metre spirit level over a 15-metre garden requires repeatedly moving the level and "stepping" your measurements down the garden. Every time you move the level, you introduce a margin of error. Over a 15-metre span, a 2mm error repeated seven times results in a 14mm discrepancy—more than enough to cause water pooling on your finished patio.
Water levels (a hosepipe filled with water) are highly accurate but notoriously slow, cumbersome, and require two people to operate effectively. In a landscape where time is money, and British weather threatens to rain off your weekend project, you need a faster, single-person solution.
This is where modern laser levels come in. However, the biggest challenge outdoors is visibility. A standard red laser is completely invisible under the glare of the midday sun. To combat this, you need a high-visibility green laser paired with a detector. If you want to dive deeper into this specific challenge, check out our guide on how to see a laser level outside in daylight.
Setting Up Your Grade: Calculating Fall for Drainage and Patios
In the UK, our notorious rainfall means that perfectly flat surfaces are actually a landscaping disaster. Any hardscape, such as a patio or driveway, must have a built-in "fall" (a slight slope) to direct rainwater away from your property's foundations and towards appropriate drainage systems, adhering to UK Building Regulations Part H.
Understanding Fall Ratios
A standard fall for a textured paving slab patio is 1:60. This means for every 60 units of horizontal distance, the patio must drop by 1 unit vertically. For a smoother surface like porcelain, a 1:80 fall is often sufficient.
The Calculation:
- Measure the total run of your patio (e.g., 6 metres, or 6000mm).
- Divide the run by your fall ratio (e.g., 6000 ÷ 60 = 100).
- Your patio needs a total drop of 100mm from the house to the end of the patio.
To set this up, you place your laser level on a tripod. Take a reading at your highest point (against the house, ensuring it sits at least 150mm below the damp proof course). Then, walk to the end of your 6-metre run with your grade rod and laser receiver. Adjust the receiver 100mm up the rod. When you dig down and place the rod so the receiver emits a solid beep, the bottom of the rod is exactly 100mm lower than your starting point. You have now established your perfect grade.
The Budget Setup: Huepar Tools vs Hiring Expensive Equipment
When looking for affordable site levelling tools, many people assume their only option is to visit a local hire shop (like HSS or Jewson) and rent a heavy-duty rotary laser. Renting a professional rotary kit can cost upwards of £80 to £120 for a weekend. If your project faces delays—a common occurrence when relying on UK weather—those hire costs quickly spiral.
Alternatively, investing in the best budget laser level for garden DIY and professional landscaping allows you to own the equipment for a fraction of the cost of a long-term hire. Huepar Llav provides a smart, heavy-duty alternative to overpriced proprietary systems. Our high-precision, 360-degree green line lasers, when paired with a compatible receiver, allow you to spot laser lines up to 60m outdoors in bright daylight.
To achieve this 60m outdoor range, your laser must have a specific feature. You can learn exactly how this works in our article: What is Pulse Mode on a Laser Level?
Case Study: Leveling a Garden for a Patio UK (Under £150 in Tool Costs)
Let’s look at a practical example of leveling a garden for a patio UK style, focusing on a 50m² space (roughly 5m x 10m) that is being transformed from an uneven, boggy lawn into a split-level Indian sandstone patio and fresh turf.
The Goal:
Excavate the site, lay and compact 100mm of MOT Type 1 sub-base, and establish a precise 1:60 fall for the patio, all while keeping tool purchasing costs under £150.
The Execution:
- Establishing the Datum: The landscaper sets up a Huepar green cross-line laser on a tripod in the centre of the garden, activating pulse mode. A datum line (a fixed reference height) is marked on a sturdy wooden stake.
- Excavation: Using a laser receiver mounted on a grade rod, the landscaper walks the site. Because they know the finished patio height must be 150mm below the house's DPC, and they need to accommodate 100mm of sub-base, 40mm of mortar, and 22mm of paving slab, they calculate an excavation depth of 162mm below the finished patio line. The receiver allows them to instantly check the depth of their digging across the entire 50m² area without running a single string line.
- Laying the Sub-Base: After laying a geotextile membrane, MOT Type 1 is wheeled in. The landscaper uses the laser and receiver to ensure the sub-base is spread evenly, perfectly mirroring the required 1:60 fall before running the wacker plate over it.
"By using a Huepar green laser and receiver combo, we cut our site prep time in half. No string lines, no second-guessing. Just precise grades that made laying the actual slabs an absolute breeze. Best of all, the laser cost less than a weekend's hire fee from the local tool shop." – Mark T., Independent UK Landscaper
Essential Accessories for Landscaping: Tripods and Grade Rods
To successfully execute outdoor landscaping and grading on a budget, the laser level itself is only one part of the equation. You need a complete system to translate that beam of light into physical ground levels.
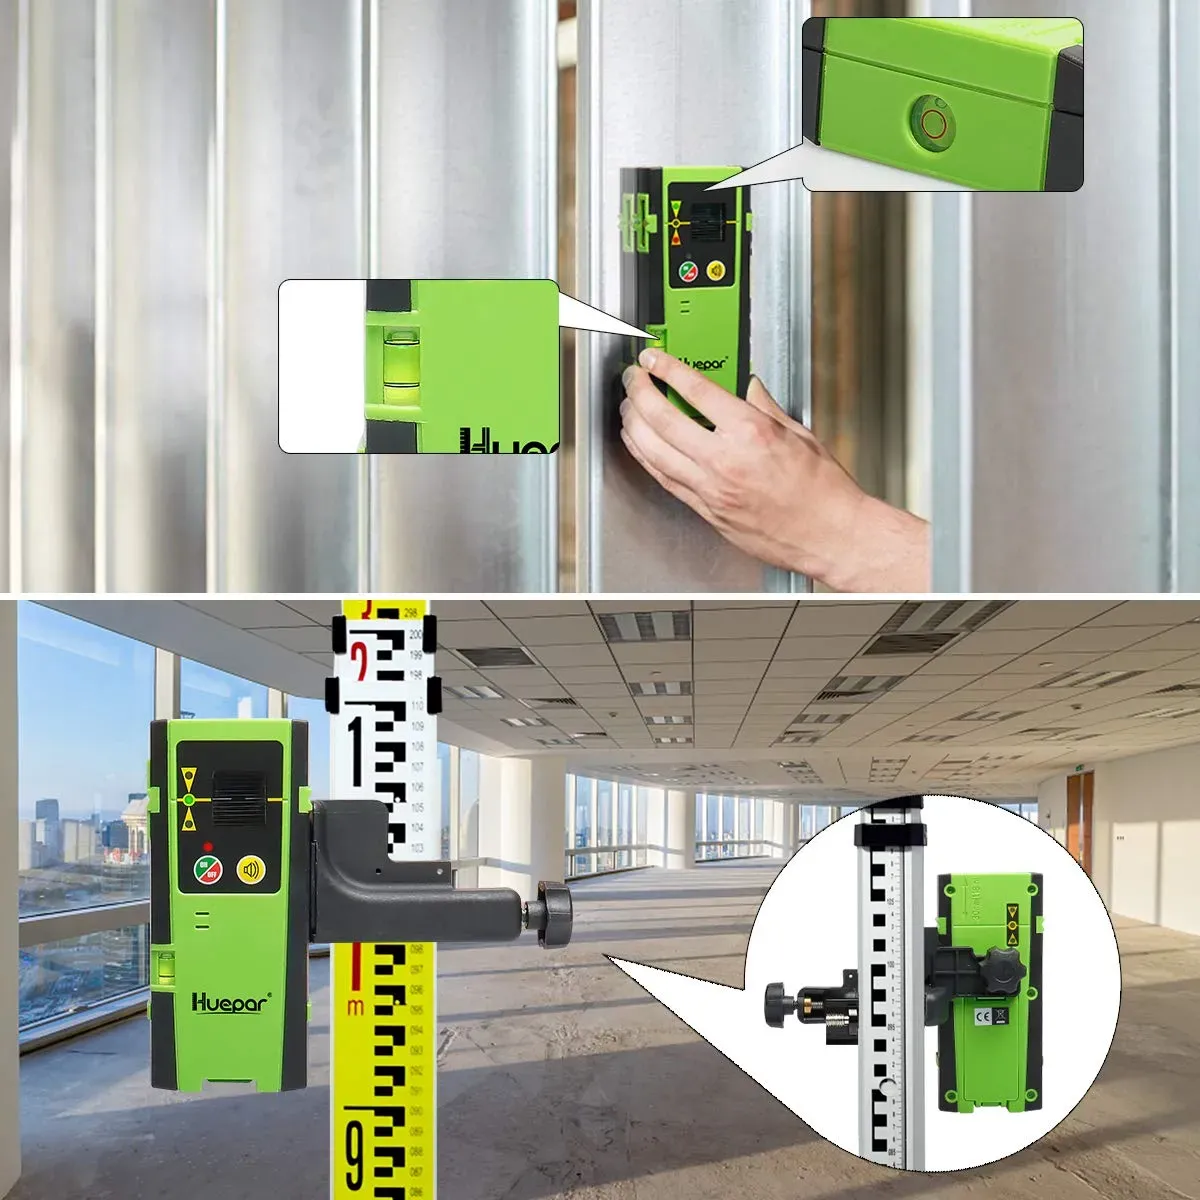
1. The Laser Receiver (Detector)
As mentioned, a receiver is non-negotiable for outdoor work. It detects the pulsing laser beam when your eyes cannot. If you are unsure whether your specific project requires one, read our guide: Do I Need a Receiver for My Laser Level?
2. A Sturdy Tripod
Outdoor terrain is rarely flat. A robust, adjustable tripod with spiked feet is essential for biting into soil or gravel, ensuring your laser remains perfectly stable and level while you stomp around the site.
3. An Aluminium Grade Rod (Staff)
A telescopic grade rod is marked with metric measurements. By sliding your laser receiver up and down the rod, you can instantly calculate height differences across your site. It is the ultimate tool for checking the depth of trenches, the height of sub-bases, and the final fall of your paving.
Frequently Asked Questions
Can I use a red laser level for outdoor landscaping?
Generally, no. Red laser beams scatter easily in natural sunlight and become invisible beyond a few metres outdoors. Green lasers are up to four times more visible to the human eye. However, for true outdoor grading over long distances, you must use a green laser equipped with pulse mode alongside a compatible laser receiver.
How accurate does my garden grading really need to be?
For drainage purposes, it needs to be highly accurate. If your patio has dips or an incorrect fall, water will pool, leading to algae growth, frost damage in the winter, and potentially damp issues in your home's brickwork. Aim for millimetre precision when laying your sub-base and mortar beds.
Is it worth buying a laser level if I am only doing one garden project?
Yes. The cost of a high-quality, budget-friendly laser level from Huepar Llav is often equivalent to or less than a 3-day hire of professional equipment. Furthermore, once you own a laser level, you will find endless uses for it, from putting up fencing and building retaining walls to hanging heavy shelves and tiling indoors.
Ready to Grade Your Garden Like a Pro?
Stop wrestling with sagging string lines and overpriced rental equipment. Equip yourself with high-precision, heavy-duty levelling tools designed to tackle the toughest UK landscaping projects.
Spot laser lines up to 60m outdoors in bright daylight.
Shop Huepar Laser LevelsReady to upgrade your site layout with {brand_name}?
Get Yours Now — £58.18